


Part Five: Apache Kafka
As discussed in an earlier blog post, we have a continuous stream of messages from aircraft transponders captured and decoded using the DUMP1090 application.
We now want to load this data into a series of Vertica tables.
As with the streaming nature of the incoming data, with many 10s, possibly 100s of messages per second being received, we want to load this data continuously into these tables. To achieve this, we will deploy Apache Kafka to capture the individual messages, and use the Vertica integration with Kafka to load this data in micro batches.

This blog post presumes that Kafka (and the various components around it – as discussed below) will be installed on a CentOS 7 environment. Although it is possible to achieve the same using other operating systems (such as Debian on a Raspberry Pi), the instructions and notes below are based on CentOS, and thus you may need make appropriate alterations to commands and functions if installing elsewhere.
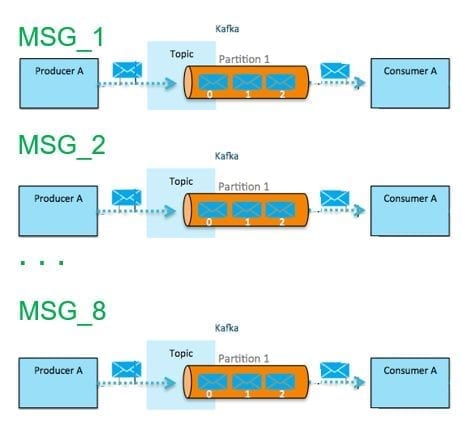
As also discussed in the previously mention blog post, the stream of messages is comprised of a set of different message types. Although there are many options for handling these messages, in this project, we have decided to separate the incoming messages, feed these into separate Kafka topics and then load each into separate Vertica tables.
This blog post discusses the establishment of a series of Kafka topics, and how we can test producing and consuming messages into and from these topics.
However, prior to creating topics, we need to install Zookeeper, Kafka and kafkacat.
Zookeeper and Kafka
If you already have a functioning installation of Kafka, then you may skip over this section.Otherwise, the instructions below provide a high-level overview of how to install Zookeeper and Kafka for use in this project. ( Zookeeper performs many functions such as leader detection, configuration management, synchronization etc. Future releases of Kafka are expected to make Zookeeper no longer a requirement.)
It should be noted that this basic installation is not intended to provide for high performance or high availability, but just to provide the minimum required to enable this project to progress.
Installing Zookeeper and Kafka dependencies To install Zookeeper and Kafka requires a couple of dependencies:
- make
- rpmdevtools
yum install make rpmdevtoolsNOTE: Text that is highlighted denotes commands you need to enter from a Linux command-line prompt.
Depending on whether these applications are already installed will determine which messages are reported next. Note that the number of messages may seem rather verbose, and have been summarised below for brevity.
In the example below, it can be observed that we already have make installed (and is at the latest version), but rpmdevtools is not installed.
<< SNIP >>Package 1:make-3.82-23.el7.x86_64 already installed and latest version
Resolving Dependencies
–> Running transaction check
—> Package rpmdevtools.noarch 0:8.3-5.el7 will be installed
–> Finished Dependency Resolution
Dependencies Resolved
===================== Package Arch Version Repository Size ===================== Installing: rpmdevtools noarch 8.3-5.el7 base 97 k Transaction Summary ===================== Install 1 Package
Total download size: 97 k Installed size: 209 k Is this ok [y/d/N]: y
Downloading packages: rpmdevtools-8.3-5.el7.noarch.rpm | 97 kB 00:00:00 Running transaction check Running transaction test Transaction test succeeded Running transaction Installing : rpmdevtools-8.3-5.el7.noarch 1/1 Verifying : rpmdevtools-8.3-5.el7.noarch 1/1
Installed: rpmdevtools.noarch 0:8.3-5.el7 Complete!
Installing Zookeeper and Kafka
To install Zookeeper and Kafka, we will start by downloading the version of Kafka for our Operating System (CentOS 7) from GitHub , and placing this is a new folder that we have already created.Although we could have prepared Kafka wherever we wanted to (e.g. /tmp), in this example we will start by placing it in a folder called “kafka” under another called “projects” within the home directory of the “dbadmin” user.
This dbadmin user is the default System Administrator for Vertica. Substitute this user for one of your own choice if you do not want to use dbadmin.
However, as rpm can only be executed by the root super user (or from one which you have “su’d to root), we need to run the following as root:
cd ~dbadminmkdir projects cd projects mkdir kafka cd kafka
git clone https://github.com/id/kafka-el7-rpm.git
Cloning into ‘kafka-el7-rpm’… remote: Counting objects: 88, done. remote: Total 88 (delta 0), reused 0 (delta 0), pack-reused 88 Unpacking objects: 100% (88/88), done.
cd kafka-el7-rpm/ make rpm
<< SNIP >>
Wrote: /home/dbadmin/projects/kafka/kafka-el7-rpm/RPMS/x86_64/kafka-0.10.0.1-1.x86_64.rpm Executing(%clean): /bin/sh -e /var/tmp/rpm-tmp.kRcZYO + umask 022 + cd /tmp/kafka-rpm/BUILD + cd kafka_2.11-0.10.0.1 + rm -rf /tmp/kafka-rpm/BUILDROOT/kafka-0.10.0.1-1.x86_64 + exit 0
<< SNIP >>
cd RPMS/x86_64 yum install kafka*.rpm
Loaded plugins: fastestmirror, langpacks Examining kafka-0.10.0.1-1.x86_64.rpm: kafka-0.10.0.1-1.x86_64 Marking kafka-0.10.0.1-1.x86_64.rpm to be installed Resolving Dependencies –> Running transaction check —> Package kafka.x86_64 0:0.10.0.1-1 will be installed –> Finished Dependency Resolution
Dependencies Resolved
===================== Package Arch Version Repository Size ===================== Installing: kafka x86_64 0.10.0.1-1 /kafka-0.10.0.1-1.x86_64 29 M
Transaction Summary ===================== Install 1 Package
Total size: 29 M Installed size: 29 M Is this ok [y/d/N]: y
Installed: kafka.x86_64 0:0.10.0.1-1 Complete!
Configuring Zookeeper and Kafka to auto start
Unless you want to manually start and stop Zookeeper and Kafka on server reboot, you may wish to set these to automatically start.As part of the Zookeeper and Kafka installation process, a number of files will have been provisioned to help with this.
cd /usr/lib/systemd/systemThe first of these is the control script for Kafka:
cat kafka.service
[Unit]
Description=Apache Kafka server (broker)
Documentation=http://kafka.apache.org/documentation.html
Requires=network.target remote-fs.target
After=network.target remote-fs.target zookeeper.service

[Service]
Type=simple
Environment=JAVA_HOME=/etc/alternatives/jre
ExecStart=/opt/kafka/bin/kafka-server-start.sh /opt/kafka/config/server.properties
ExecStop=/opt/kafka/bin/kafka-server-stop.sh

[Install]
WantedBy=multi-user.target
The second for Zookeeper:cat zookeeper.service
[Unit]
Description=Apache Zookeeper server
Documentation=http://zookeeper.apache.org
Requires=network.target remote-fs.target
After=network.target remote-fs.target zookeeper.service

[Service]
Type=simple
ExecStart=/opt/kafka/bin/zookeeper-server-start.sh /opt/kafka/config/zookeeper.properties
ExecStop=/opt/kafka/bin/zookeeper-server-stop.sh
WorkingDirectory=/var/lib/zookeeper

[Install]
WantedBy=multi-user.target
To manually start the Zookeeper service (which should just return to the command line without any notifications) run the following:
systemctl start zookeeper.serviceTo check if the Zookeeper service is running run the following:
systemctl status zookeeper.servicezookeeper.service – Apache Zookeeper server
Loaded: loaded (/usr/lib/systemd/system/zookeeper.service; disabled; vendor preset: disabled)
Active: active (running) since Sat 2017-04-22 08:47:59 CEST; 27s ago
Docs: http://zookeeper.apache.org
<< SNIP >>
To manually start the Kafka service (which should just return to the command line without any notifications) run the following:
systemctl start kafka.serviceTo check if the Kafka service is running run the following:
systemctl status kafka.servicekafka.service – Apache Kafka server (broker)
Loaded: loaded (/usr/lib/systemd/system/kafka.service; disabled; vendor preset: disabled)
Active: active (running) since Sat 2017-04-22 08:48:54 CEST; 13s ago
Docs: http://kafka.apache.org/documentation.html
<< SNIP >>
To automatically start the Zookeeper and Kafka services on server reboot, we need to enable them within the “systemd” system and services manager:
systemctl enable zookeeper.serviceCreated symlink from /etc/systemd/system/multi-user.target.wants/zookeeper.service to /usr/lib/systemd/system/zookeeper.service.
systemctl enable kafka.serviceCreated symlink from /etc/systemd/system/multi-user.target.wants/kafka.service to /usr/lib/systemd/system/kafka.service.
Finally, unless we are going to disable the firewall (which we do not need to do), we will need to add the 2181 and 9092 ports for use with TCP:
firewall-cmd --permanent --add-port=2181/tcpsuccess
firewall-cmd –permanent –add-port=9092/tcp
success
firewall-cmd –reload
Success
Then reboot the system and check that the Zookeeper and Kafka are running:
ss -ntlup | grep 2181tcp LISTEN 0 50 :::2181 :::* users:((“java”,pid=1086,fd=80))
ss -ntlup | grep 9092
tcp LISTEN 0 50 :::9092 :::* users:((“java”,pid=1088,fd=96))
Kafkacat
There are a number of ways in which we can interact with our Kafka topics for producing and consuming messages.We are going to use a tool called “kafkacat”. This is a non-JVM producer and consumer for Kafka, and is described on GitHub (from where we are going to download it from), as a “netcat for Kafka”.
As discussed in another blog post for this project, we will be feeding streams of messages from aircraft transponders into a series of Kafka topics. For this, we will use kafkacat in producer mode. This allows us to pass messages via a standard in (stdin) channel into a topic as defined by the topic parameter (-t), of a partition (-p), within a Kafka cluster (or broker) using the -b parameter. The flag to indicate we want to use kafkacat in producer mode is -P.
We will also use kafkacat in consumer mode to check the messages are being produced. This option is useful for confirming everything upstream of Kafka (including the data capture on the Raspberry Pi’s radio receiver and DUMP1090) is working correctly prior to moving further forward and consuming this data via the Vertica/Kafka integration and on into the Vertica tables.
As one may guess, if -P is the flag we use to produce messages, we use -C to consumer messages.
Installing kafkacat dependencies To install kafkacat we have two dependencies:
• cmake
• doxygen
Logged in as root (or having “su’d” to root from an account that is able to do so), run the following command:
yum install cmake doxygen<< SNIP >> Package 1:doxygen-1.8.5-3.el7.x86_64 already installed and latest version Resolving Dependencies –> Running transaction check —> Package cmake.x86_64 0:2.8.12.2-2.el7 will be installed –> Finished Dependency Resolution
Dependencies Resolved
===================== Package Arch Version Repository Size =====================
Installing: cmake x86_64 2.8.12.2-2.el7 base 7.1 M
Transaction Summary =====================
Install 1 Package
Total download size: 7.1 M Installed size: 27 M Is this ok [y/d/N]: y Downloading packages: cmake-2.8.12.2-2.el7.x86_64.rpm | 7.1 MB 00:00:01 Running transaction check Running transaction test Transaction test succeeded Running transaction Installing : cmake-2.8.12.2-2.el7.x86_64 1/1 Verifying : cmake-2.8.12.2-2.el7.x86_64 1/1
Installed: cmake.x86_64 0:2.8.12.2-2.el7
Complete!
Installing Kafkacat With the dependencies installed, we can now proceed with installing kafkacat. Having already tried and failed to install this via other routes, the simplest method I have found is to use Eden Hill’s (the author of kafkacat) quick build process as defined by a bootstrap.sh command.
Further details of kafkacat can be found here: https://github.com/edenhill/kafkacat
cd /tmp
git clone https://github.com/edenhill/kafkacat.git
Cloning into ‘kafkacat’… remote: Counting objects: 686, done. remote: Compressing objects: 100% (6/6), done. remote: Total 686 (delta 0), reused 0 (delta 0), pack-reused 680 Receiving objects: 100% (686/686), 260.41 KiB | 0 bytes/s, done. Resolving deltas: 100% (386/386), done.
cd kafkacat ./bootstrap.sh
<< SNIP (several hundred lines of messages later>>
Success! kafkacat is now built
<< SNIP >>
Creation of Kafka topics
As mentioned above, we are going to create a topic for each of the message types.Depending on how you have installed and/or configured DUMP1090 (as described in an earlier blog post), you may find that not all of these topics will be populated with messages. However, to simplify this project, we will nevertheless create all of the topics.
With an installation of Kafka, comes a utility called kafka-topics.sh. Amongst other options, one is to create topics. As mentioned earlier, we are not attempting to build a highly performant or high availability solution. We are therefore going to create these topics with a replication factor of one and with just one partition. We will also be creating topics with names that correspond to the message types from which their data will be derived, and in due course will create corresponding tables in the Vertica database with the same names as their corresponding topics.
Of course, this is not a requirement, but does make understanding, navigating, and debugging far easier.
kafka-topics.sh --create --zookeeper localhost:2181 --replication-factor 1 --partitions 1 --topic dump1090_airkafka-topics.sh –create –zookeeper localhost:2181 –replication-factor 1 –partitions 1 –topic dump1090_id
kafka-topics.sh –create –zookeeper localhost:2181 –replication-factor 1 –partitions 1 –topic dump1090_sta
kafka-topics.sh –create –zookeeper localhost:2181 –replication-factor 1 –partitions 1 –topic dump1090_msg_1
kafka-topics.sh –create –zookeeper localhost:2181 –replication-factor 1 –partitions 1 –topic dump1090_msg_2
kafka-topics.sh –create –zookeeper localhost:2181 –replication-factor 1 –partitions 1 –topic dump1090_msg_3
kafka-topics.sh –create –zookeeper localhost:2181 –replication-factor 1 –partitions 1 –topic dump1090_msg_4
kafka-topics.sh –create –zookeeper localhost:2181 –replication-factor 1 –partitions 1 –topic dump1090_msg_5
kafka-topics.sh –create –zookeeper localhost:2181 –replication-factor 1 –partitions 1 –topic dump1090_msg_6
kafka-topics.sh –create –zookeeper localhost:2181 –replication-factor 1 –partitions 1 –topic dump1090_msg_7
kafka-topics.sh –create –zookeeper localhost:2181 –replication-factor 1 –partitions 1 –topic dump1090_msg_8
NOTE: On creating these topics, it is probable that you will receive a warning similar to the following:
WARNING: Due to limitations in metric names, topics with a period (‘.’) or underscore (‘_’) could collide. To avoid issues it is best to use either, but not both.
As we have used only one of these character (the ‘_’ underscore), we can safely ignore these messages.
If you prefer, you could create a script such as the one below to achieve the same:
for topic in air id sta msg_1 msg_2 msg_3 msg_4 msg_5 msg_6 msg_7 msg_8

do
kafka-topics.sh --create --zookeeper localhost:2181 --replication-factor 1 --partitions 1 --topic dump1090_${topic}

done
Producing and consuming test messages using kafkacat
The blog post covering Extract, Transform & Loading ADS-B messages into Kafka describes how, in this project, we can take the continuous stream of messages from aircraft transponders, perform some simple transformation before loading these messages into the series of Kafka topics.A further blog post discusses how the messages arriving in the Kafka topics will be consumed by Vertica and loaded into their respective tables within the database.
However, to make sure everything is working with respect to Zookeeper, Kafka and Kafkacat, we can optionally chose to perform some simple tests.
For this, we will create another topic called test. We will then produce some messages into this topic using the -P option of kafkacat, and then consume these messages using the -C option.
To create the test topic, issue the following command:
kafka-topics.sh --create --zookeeper localhost:2181 --replication-factor 1 --partitions 1 --topic testTo produce a “Hello World” message run the following:
echo "Hello World" | kafkacat -P -b localhost -t testAnd finally, to consumer this message run the following:
kafkacat -C -b localhost -t testThe next blog post in this series describes how, using a simple Extract, Transform and Load (ETL) process, we can capture messages from a TCP stream, extract the individual message types, perform some simple transformation before feeding them into a series of message buffers and then produce them into their respective Kafka topics using kafkacat.

Related Links:
In case you missed it, here’s a link to the first post with the overview of the project.Here’s part two in this series.
Here’s the third blog post in this series.
Here’s the fourth in this series of blog posts.
Also, check out this YouTube video of me, Mark Whalley, in an airline pilot’s uniform discussing the project.
Here’s an infographic that summarizes the Flight Tracker project.
And, by the way, this project won first place at the Arkansas University Raspberry Pi Bakeoff!
About the Author
Mark Whalley
Manager, Vertica Education
From the early 1980s, Mark worked with Michael Stonebraker's Ingres RDBMS and then a number of column-store big data analytics technologies.
In 2016, he joined HPE Big Data Platform as a Systems Engineer specialising in Stonebraker’s Vertica.
In September 2017 he followed Vertica as it merged into Micro Focus – one of the world’s largest pure-play software companies.
He is passionate about technology and frequently delivers talks at the London, Cambridge and Munich Big Data & Machine Learning Meetups (of which he is the founder with its 4K+ members), the British Computer Society – Advanced Programming Specialist Group, Vertica Forums, the Institute for Analytics and Data Science at the University of Essex et al.
He is a technical blogger and author.