


Vertica Integration with IBM InfoSphere DataStage: Connection Guide
About Vertica Connection Guides
Vertica connection guides provide basic instructions for connecting a third-party partner product to Vertica. Connection guides are based on our testing with specific versions of Vertica and the partner product.
Vertica and DataStage: Latest Versions Tested
| Software | Version |
|---|---|
| Partner Product |
IBM InfoSphere DataStage 11.7.1 |
| Partner Product Platform |
Windows 10 Pro (DataStage server and client) |
| Vertica Client |
Vertica JDBC and ODBC 23.4 |
| Vertica Server | Vertica Analytic Database 23.4 |
DataStage Overview
IBM InfoSphere DataStage is an ETL tool that integrates and transforms source system data into data marts and data warehouses.
The IBM InfoSphere DataStage client has three components:
- Administrator client allows you to manage tasks for DataStage projects.
- Designer client is the tool you use to design your DataStage jobs.
- Director client manages the jobs in the DataStage engine.
- Metadata Asset Manager allows you to import table definitions using JDBC.
Installing DataStage
- Navigate to the IBM Support downloads page.
-
Scroll down the page to the appropriate table and click the name of your operating system.
Before starting the download, review the information provided.
- Download DataStage and the installation instructions.
To view the release notes for the tested version of IBM InfoSphere Information Server 11.7, go to the IBM Knowledge Center.
Installing the Vertica Client Drivers
DataStage uses the Vertica JDBC and ODBC drivers to connect to Vertica. Follow these steps to install the Vertica Client Drivers:
-
Navigate to the Client Drivers page on the Vertica website.
-
Download the JDBC driver package.
-
Download the ODBC driver that is compatible with the architecture of your DataStage operating system and Vertica server version.
Note
For details about client and server compatibility, see Client Driver and Server Version Compatibility in the Vertica documentation.
-
Follow the installation instructions in the Vertica documentation:
- (JDBC only) Copy the Vertica JDBC .jar file to the DataStage directory for external libraries.
- (ODBC only) Create a DSN as described in Creating an ODBC Data Source Name (DSN).
Configuring Environment Variables for Your Project
Before you create a project in DataStage, set up the Vertica related environment variables:
-
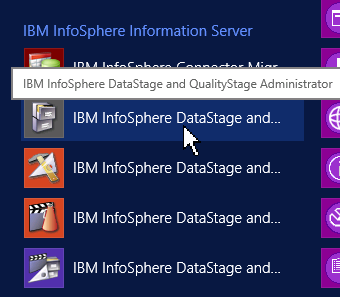
On the Windows Apps screen, double-click IBM InfoSphere DataStage and QualityStage Administrator to open the Administrator Client:
- Enter your credentials in the Attach to DataStage window, and click Login.
-
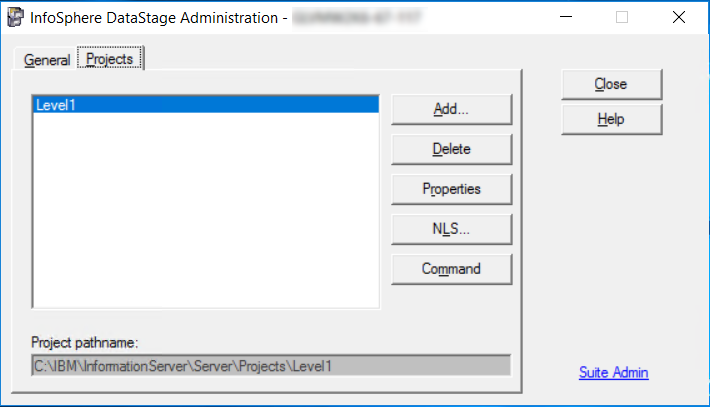
Select the Projects tab from the DataStage Administration screen.
-
Select your project name and click Properties.
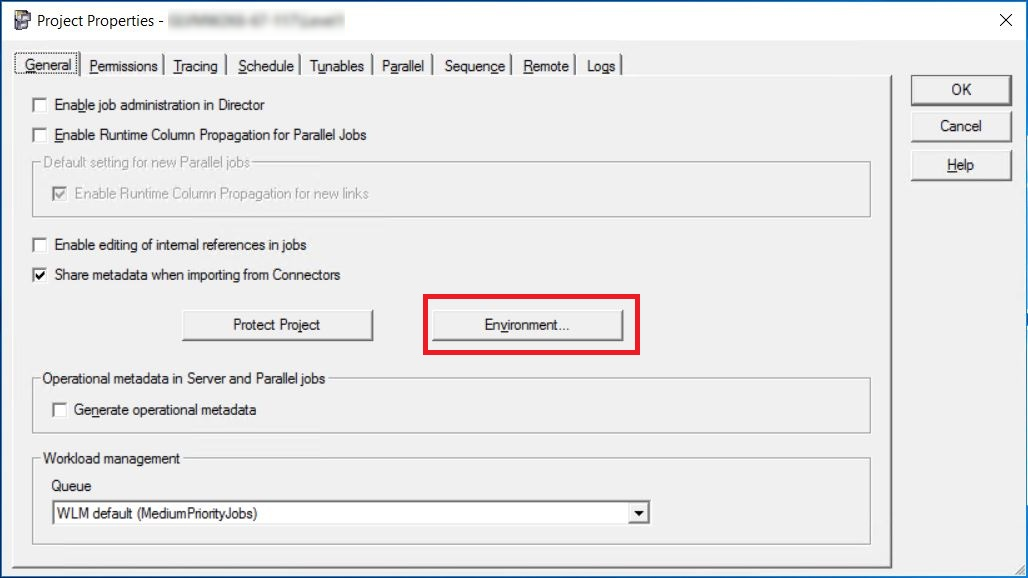
-
Click Environment from the Project Properties screen.
-
Set the DataStage environment variables as follows:
Environment Variable Category Setting APT_PM_SHOW_PIDS Parallel > Reporting True APT_PM_PLAYER_TIMING Parallel > Reporting True APT_DEFAULT_TRANSPORT_BLOCK_SIZE Parallel 10000000 APT_USE_IPV4 Parallel True APT_PM_SHOWRSH Parallel > Reporting True APT_DUMP_SCORE Parallel > Reporting True APT_STARTUP_STATUS Parallel > Reporting True APT_PMCONDUCTOR_HOSTNAME Parallel Machine name APT_IO_MAXIMUM_OUTSTANDING Parallel 2097152 APT_PM_CONDUCTOR_TIMEOUT User-Defined 320 APT_PM_PLAYER_TIMEOUT User-Defined 120
Note For a full list of DataStage environment variables, see Environment Variables in the IBM Knowledge Center.
Configuring the Designer Client
-
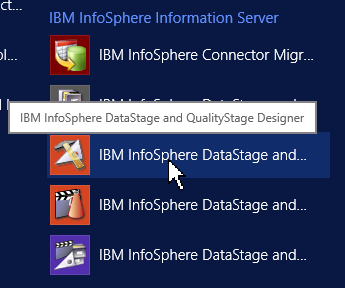
Double-click IBM InfoSphere DataStage and QualityStage Designer on the Windows Apps screen to open the Designer Client:
- Enter your credentials in the Attach to Project screen and click Login
Connecting DataStage to Vertica
Before you configure your connection from DataStage to Vertica, ensure that you are connected to IBM WebSphere Services.
Configuring ODBC on Windows
To test the ODBC driver:
- Open Control Panel > Administrative Tools.
- Open the ODBC Data Source Administrator (32-bit) for your system system as DataStage Client uses 32-bit ODBC DSNs.
-
Ensure that your data source is configured to use the Vertica driver as shown.
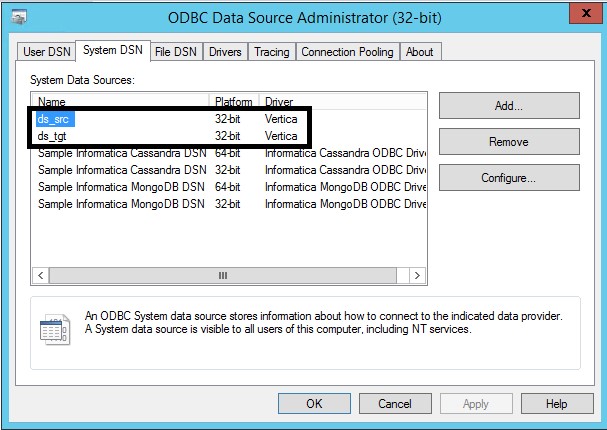
- Double-click the connection.
- On the Vertica ODBC DSN Configuration page, click Test Connection.
Importing Vertica Data Definitions into DataStage using ODBC
-
Select Import > Table Definitions > ODBC Table Definitions in DataStage client.
The Import Meta Data (ODBC) window appears.
-
Select DSN name from the DSN drop-down and provide the database credentials to connect. Click OK.
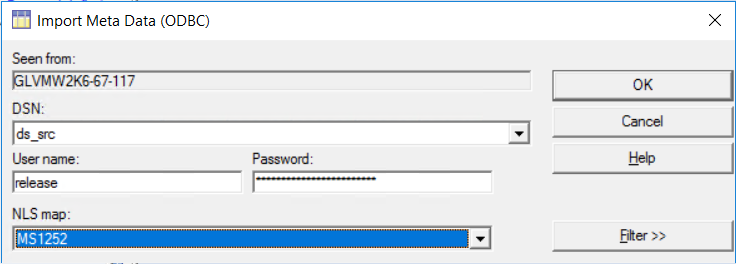
- For both the source and target databases, perform the following:
- Select DSN from the drop-down menu.
- Enter credentials and click OK.
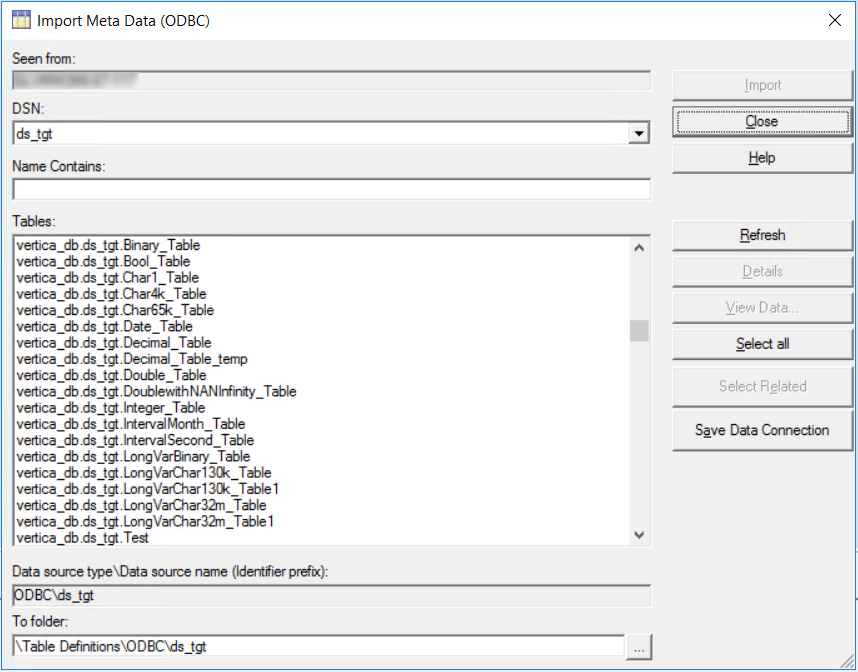
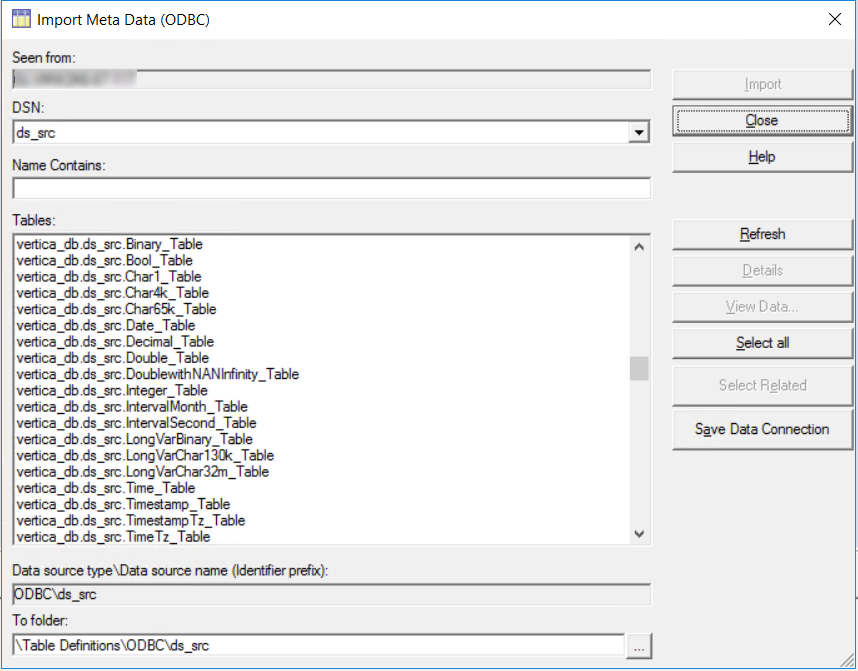
Select the required tables and click Import.
DataStage verifies the ODBC configuration and lists the tables that you have defined on that database.
Note In this example, the source and the target Meta Data are the same, so you only have to import the Meta Data from the source.
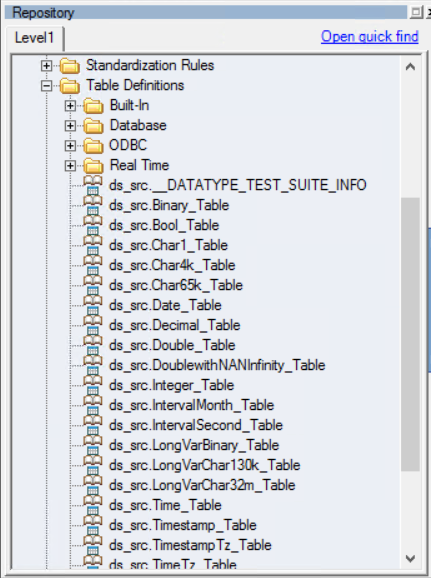
The following image lists the target database tables.
If the DSN entries appear in the drop-down list, the configuration of the
odbc.inianduvodbc.configfiles are correct. Otherwise, correct them in your Linux environment as described in Vertica Integration with IBM InfoSphere DataStage: Connection Guide.
To define the source and target table definitions in DataStage, you can import the metadata for those objects.
Note Under DSN, ensure the drop-down menu lists both your source and target database DSNs.
The Import Meta Data window opens.
Configuring JDBC on Windows
To configure JDBC driver on Windows, you need the DataStage isjdbc.config file located in DSHOME directory. This file contains information about CLASSPATH and CLASS_NAMES. You need to update the CLASSPATH and CLASS_NAMES as shown including the semicolon.
On Windows, DSHOME is C:\IBM\InformationServer\Server\DSEngine
CLASSPATH=/opt/vertica/vertica-jdbc-23.4.0.jar;
CLASS_NAMES=com.vertica.jdbc.Driver;
Importing Vertica Data Definitions into DataStage using JDBC
-
In a web browser, type https or http://server-IP:port/ibm/iis/imam/console to open the Infosphere MetaData Asset Manager.
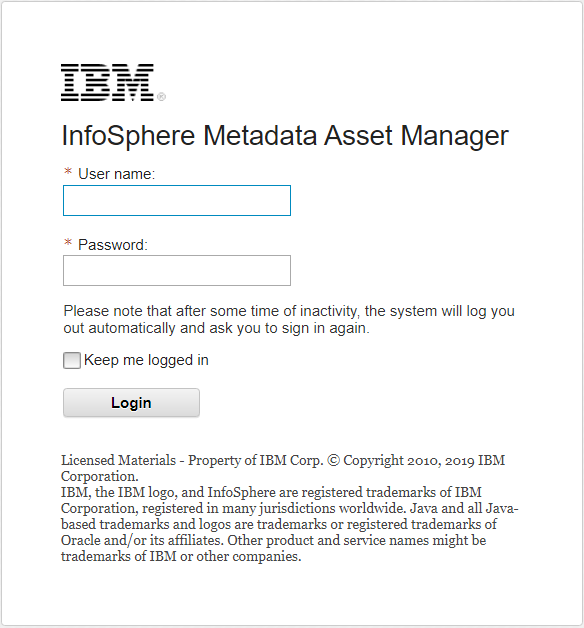
- Enter the credentials and click Login.
-
Click Import, and then click New Import Area.
The Create New Import Area dialog box appears.
Provide the following details:
-
Import area name: Provide the asset import area name that suits the business requirements.
-
Import area description (Optional): Provide a description of the Asset Import Area.
-
MetaData interchange server: Select the server machine from the drop-down list.
-
Select a Bridge or Connector: Select JDBC Connector in the IBM folder.

-
- Click Next.
-
Click Select Data Connection icon adjacent to the Data connection box and click New Data Connection.
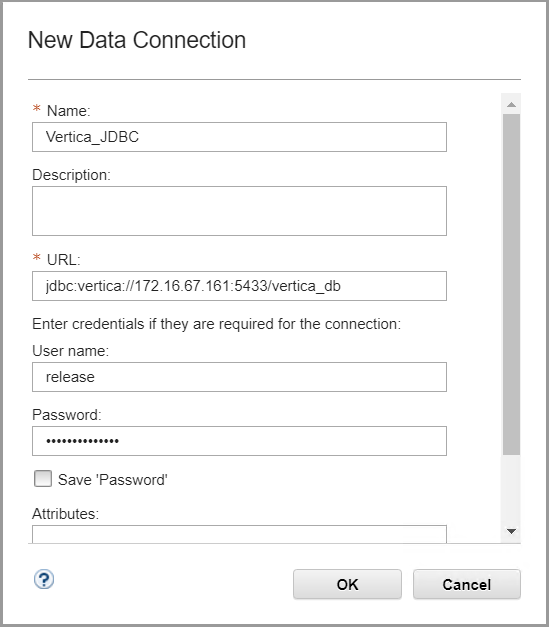
• Name: Type in the name of the JDBC data connection.
• URL: Type the Vertica JDBC URL in the following format:
jdbc:vertica://hostname or IP:5433/db_name
• Type the database User name and Password
- Click Test Connection.
- Click OK after a successful connection.
-
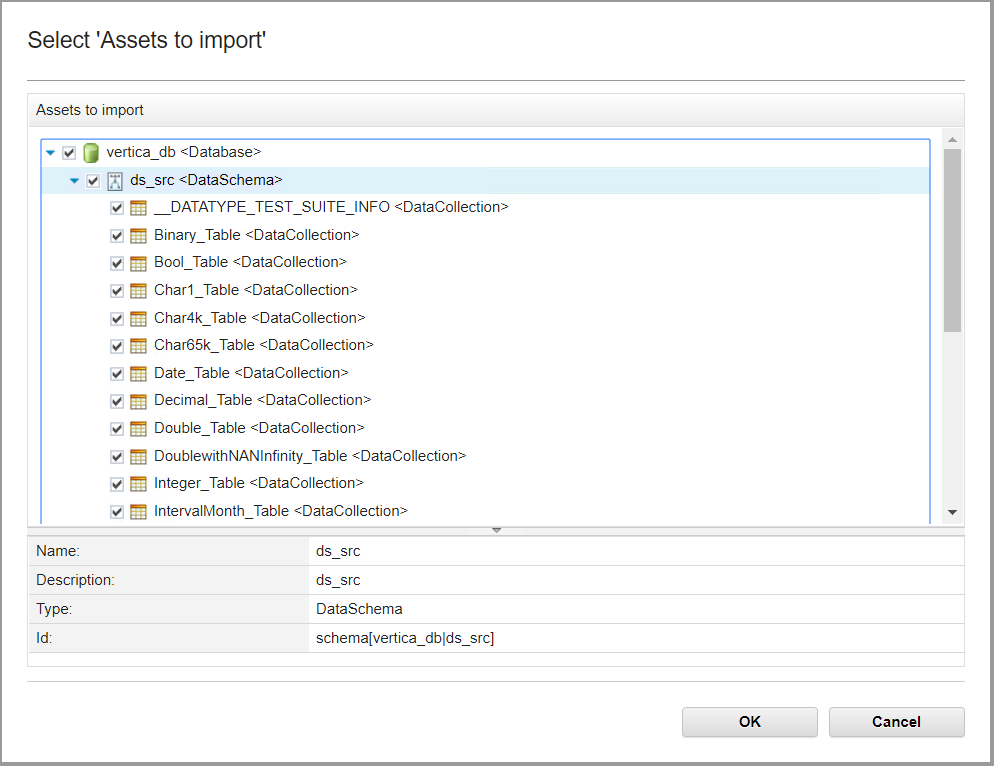
Click the required check boxes to include tables and views. Provide a schema name or table name filter, if required.
-
Click the Select 'Assets to Import' icon adjacent to Assets to import box.
-
Select the required assets, click OK and then click Next.
-
Select Host system name and database by clicking the Select existing asset icons and click Next.
-
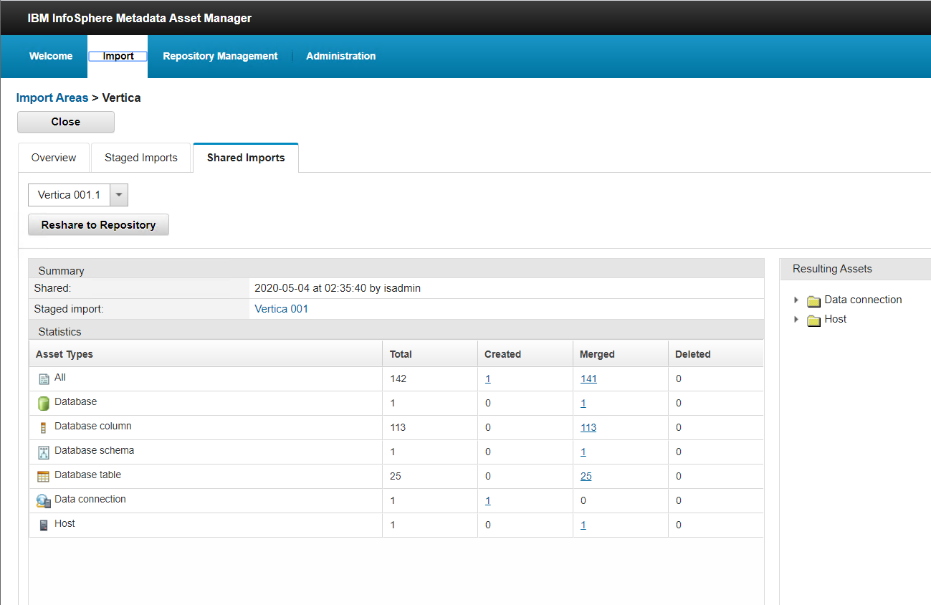
Provide an Import Description and select Express Import or Managed Import and then click Import.
-
The newly imported assets are displayed in the Import tab of Metadata Asset Manager.
-
In the DataStage Designer Client, click Repository > Metadata Sharing > Create Table Definition from shared Table
- Select the imported asset that you want to create a table definition from.
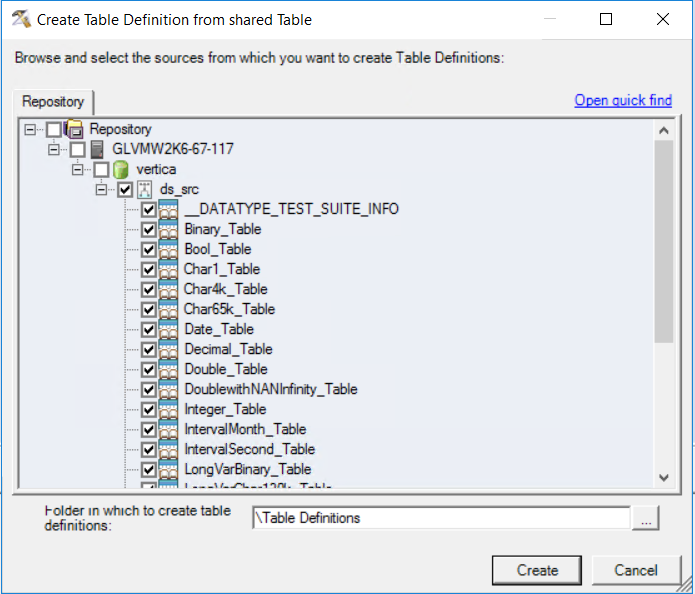
-
Click Create.
The required table definition is displayed in the Table Definitions folder in the navigation pane.
-
To import target table definitions, repeat the steps above.
Note In this example, the source and target meta data are the same, so you only need to import meta data from the source.
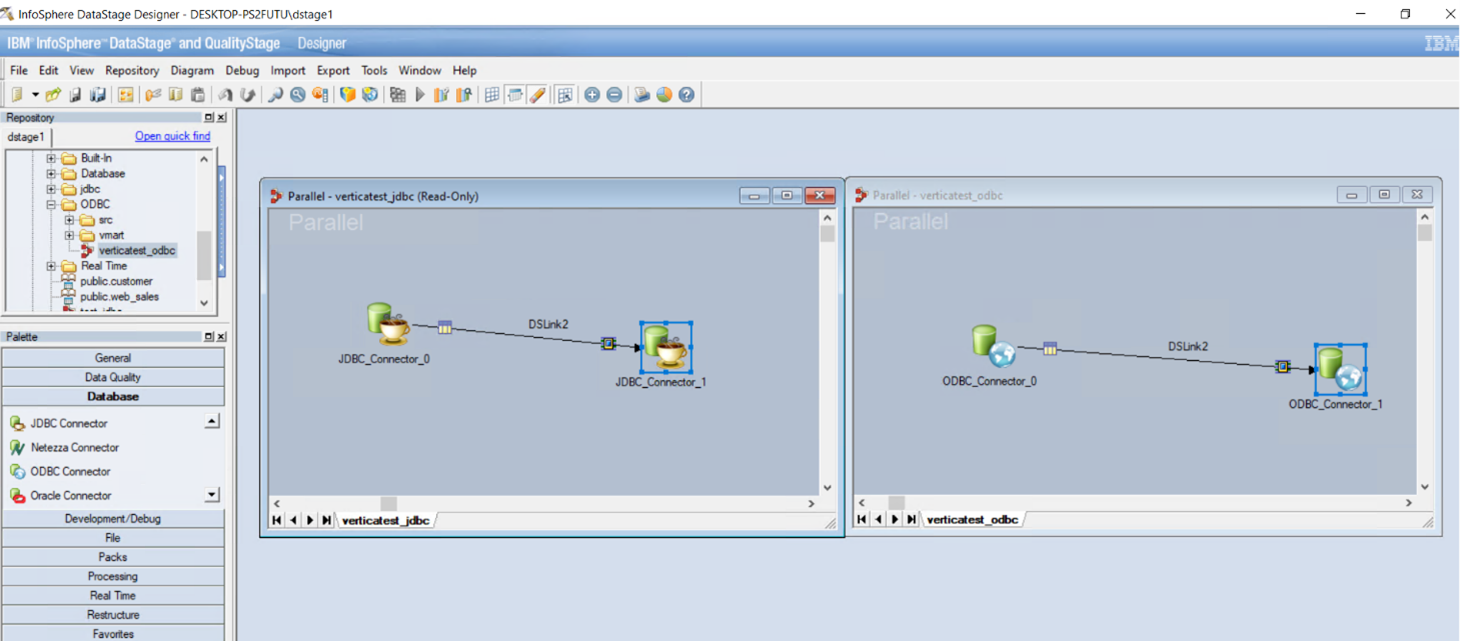
For more information about creating, compiling, and running jobs, see DataStage documentation. When creating a job using ODBC or JDBC, you must create a PARALLEL job with Vertica as a PARALLEL job contains both ODBC and JDBC connector whereas a SERIAL job contains only the ODBC connector. In addition, you must select an ODBC or JDBC connector for a job from the Database drop-down menu when connecting to Vertica.
Troubleshooting
You may encounter some issues when connecting to Vertica using IBM DataStage. This topic describes known issues and workarounds.
Empty DSN List
Explanation: When connecting to ODBC, the DSN drop-down list on the Import Meta Data page does not show the connection value.
Solution: Check the uvodbc.config file in the DSHOME/Projects directory. Depending on your operating system, add the following entries to the uvodbc.config file.
For Windows:
DSHOME=C:\IBM\InformationServer\Server\DSEngine for Windows
Configuration File JDBC Cannot be accessed
Explanation: This error occurs when you try to access the source or target database using JDBC.
Solution: Provide read access to the dsadm user, or give read access to all users. The isjdbc.config file should be located in the DSEngine directory.
String Data Too Big
The error is as follows:
target,0: ODBC function "SQLPutData()" reported: SQLSTATE = 22001: Native Error Code = 10,170: Msg = [Vertica][ODBC] (10170) String data right truncation on data from data source: String data is too big for the driver's data buffer. (CC_OdbcLobSupport::writeLobData, file CC_OdbcLobSupport.cpp, line 261)
Explanation: You might see this error message when loading string data or similar data types with high precision.
Solution: Set the value of the environment variable APT_DEFAULT_TRANSPORT_BLOCK_SIZE to 10000000.
ODBC Connector Array Size
The error is as follows:
ODBC_Connector_0,0: The array size must be set to 1 when reading LOBs (CC_OdbcDBRecordDataSetProducer::dbsAllocateBindBuffers, file CC_OdbcDBRecordDataSetProducer.cpp, line 587)
Explanation: You might see this error message when loading string data or similar data types with high precision.
Solution: In DataStage, change the array size value to 1 in ODBC stages.
Pxbridge
The error is as follows:
main_program: Syntax error: Error in "pxbridge" operator: Error in output redirection: Error in output parameters: Error in modify adapter: Error in binding: Error parsing field type: Parsing parameters "1024,0" for schema type "decimal": Precision must be > 0 and <= 255, got: "1024"
Explanation: You see this error when you load decimal data or similar data types with a precision value greater than 255.
Solution: Change the precision value in the DDL to an integer between 1 and 255.
SQLGetPrivateProfileString
The error is as follows:
[S1000][unixODBC][DSI] The error message NoSQLGetPrivateProfileString could not be found in the en-US locale. Check that /en-US/ODBCMessages.xml exists.
[ISQL]ERROR: Could not SQLConnect.
Explanation: You might see this error in a Linux environment when you configure the ODBC driver. It is related to odbc.ini file configuration.
Solution: Usually ErrorMessagePath is set as: /opt/vertica/lib64. Add the en-US dir under the lib64 entry.
Known Limitations
Before using DataStage, be aware of the following known limitations:
ODBC Limitations
-
TIME data type does not display milliseconds.
-
TIMESTAMP data type does not display milliseconds on for Write operations only.
-
TIMETZ and TIMESTAMPTZ data types do not display milliseconds and timezone offset.
-
For NUMBER data type, precision up to 255 digits is displayed.
-
For LONG VARBINARY 8m and LONG VARCHAR 32m data types, the “the record is too big to fit in a block” error is displayed.
-
For INTERVAL HOUR TO SECOND(0), INTERVAL HOUR TO SECOND, INTERVAL HOUR TO MINUTE, INTERVAL DAY TO SECOND, INTERVAL YEAR TO MONTH, and UUID data types, unknown data type is displayed.
JDBC Limitations
- For INTERVAL HOUR TO SECOND(0), INTERVAL HOUR TO SECOND, INTERVAL HOUR TO MINUTE, INTERVAL DAY TO SECOND, and INTERVAL YEAR TO MONTH data types, the error "Driver does not support" appears when executing jobs.
- For TIME data type, milliseconds are not displayed.
- For TIMETZ and TIMESTAMPTZ data types, milliseconds and timezone offset are not displayed.
- For NUMBER data type, precision up to 255 digits is displayed.
-
For LONG VARBINARY 8m and LONG VARCHAR 32m data types, the tool does not respond when trying to display data.
For More Information
- IBM InfoSphere DataStage
- Understanding IBM WebSphere DataStage
- Vertica Community Edition
- Vertica Community
- Vertica Documentation

