


Vertica Integration with Pentaho Mondrian Using Schema Workbench: Connection Guide
About Vertica Connection Guides
Vertica connection guides provide basic instructions for connecting a third-party partner product to Vertica. Connection guides are based on our testing with specific versions of Vertica and the partner product.
Vertica and Pentaho Schema Workbench: Latest Versions Tested
| Software | Version |
|---|---|
| Partner Products |
Pentaho Business Analytics Enterprise Edition 9.2.0.0-290 64 bit Pentaho User Console - Analysis Report Schema Workbench |
| Desktop Platform |
Microsoft Windows Server 2016 |
| Vertica Client |
Vertica JDBC Driver 11.0.2-0 |
| Vertica Server | Vertica Analytic Database 11.0.2-0 |
Pentaho Schema Workbench Overview
Pentaho Schema Workbench is a design tool to create logical multi-dimensional models aka Mondrian schemas/cubes from your data in Vertica. Schema Workbench generates Multi-Dimensional Expression (MDX) query language, an XML metadata standard for describing multidimensional data models.
You can use Pentaho Analysis Report in the User Console to visualize your Mondrian schemas/cubes.
To learn about Pentaho Schema Workbench and Pentaho Mondrian, see the Pentaho documentation:
- Pentaho Schema Workbench - Schema Workbench enables you to create the Mondrian schema and deploy it on the Pentaho Server.
- Pentaho Mondrian - Mondrian is the OLAP engine component that is embedded in Pentaho Server.
Installing Pentaho Business Analytics (BA) Platform
You can download the latest version of Pentaho Business Analytics as follows:
Enterprise Edition
- Navigate to https://www.hitachivantara.com/en-us/home.html.
- From the menu, click PRODUCTS > Download Pentaho.
- Scroll down and click START YOUR TRIAL!.
- Fill out the form and click DOWNLOAD FREE TRIAL.
- Save the downloaded .exe file on your computer.
- Double-click the installer .exe and follow the prompts for installation.
Installing the Vertica Client Driver
Pentaho BA connects to Vertica using the Vertica JDBC driver. The Vertica JDBC jar file should be placed in different locations depending on the Enterprise Edition components you are using. Follow these steps:
- Navigate to the Client Drivers page on the Vertica website.
-
Download the JDBC driver package.
Note For details about client and server compatibility, see Client Driver and Server Version Compatibility in the Vertica documentation.
- Copy the JAR file you downloaded.
- Paste the Vertica JAR file in the specified location:
Note [Pentaho Server Home] is the directory where Pentaho Server is installed. [SWB Home] is the directory where Pentaho Schema Workbench is installed.
Component JAR File Location Analysis Report and Dashboard C:\Pentaho\server\pentaho-server\tomcat\lib Schema Workbench C:\Pentaho\design-tools\schema-workbench\lib - Restart the Pentaho BA server.
How Vertica Works with Pentaho Mondrian using Schema Workbench
Using Pentaho Schema Workbench, you can create a multi-dimensional model based on your data in Vertica. You can then deploy the model/cubes to Pentaho BA Server, where you can explore and analyze the data.
These are the basic steps:
- Create a connection to Vertica in Pentaho Schema Workbench and in Pentaho User Console with the same name and connection information.
- In Pentaho Schema Workbench, create a cube based on your data in Vertica.
- In Pentaho Schema Workbench, publish the cube to Pentaho BA Server.
- In Pentaho User Console, explore the Vertica data in the cube you just published using a tool such as Analysis Report.
Connecting Pentaho Schema Workbench to Vertica
-
Launch Pentaho Schema Workbench.
-
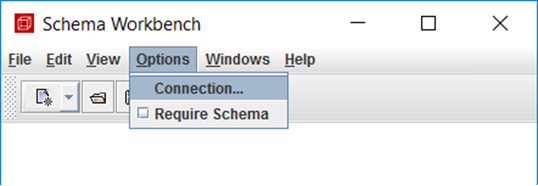
In the main menu of Schema Workbench, select Options > Connection.
The Database Connection dialog appears.
-
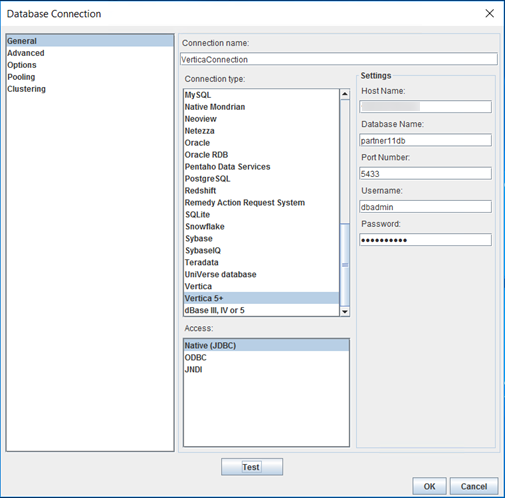
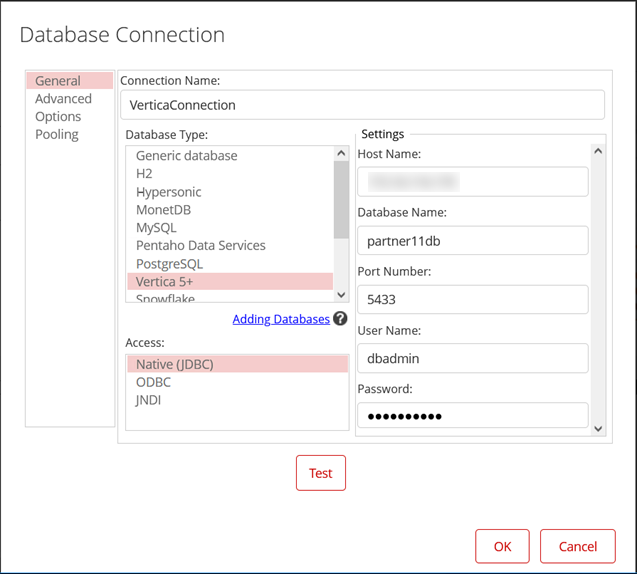
In the Database Connection dialog, provide or select the following information:
-
Connection Name: Type a name for the connection.
Note The connection name should be the same in Schema Workbench and in Pentaho User Console.
-
Connection Type: Select Vertica 5+.
-
Access: Select Native (JDBC).
-
Host Name: Type the IP Address of the Vertica server.
-
Database Name: Type the name of the database.
-
Port Number: Type the port number of the database.
-
User Name: Type the name of the database user.
-
Password: Type the database user password.
-
- Click Test to test the connection.
-
When the connection is successful, click OK.
Connecting Pentaho BA Server to Vertica
-
Navigate to Pentaho User Console http://localhost:8080/pentaho/Login.
-
In the login page, expand Login as an Evaluator, and then click Go to log in to Pentaho User Console as an Administrator.

-
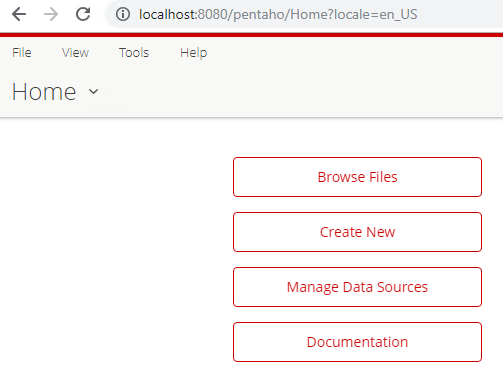
In the Home page of Pentaho User Console, click Manage Data Sources.
-
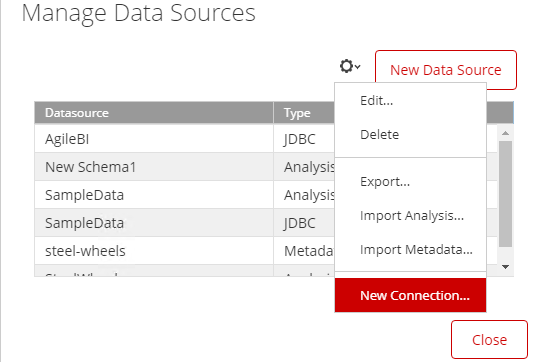
In the Manage Data Sources page, click the gear icon and select New Connection.
-
In the Database Connection page, provide or select the following information:
-
Connection Name: Type the name for the connection.
Note The connection name should be the same in Pentaho User Console and Schema Workbench.
-
Database Type: Select Vertica 5+.
-
Access: Select Native (JDBC).
-
Host Name: Type the IP address of the Vertica server.
-
Database Name: Type the name of the database.
-
Port Number: Type the port number of the database.
-
User Name: Type the name of the database user.
-
Password: Type the database user password.
-
- Click Test to test the connection.
- When the connection is successful, click OK.
Creating a Sample Cube in Pentaho Schema Workbench
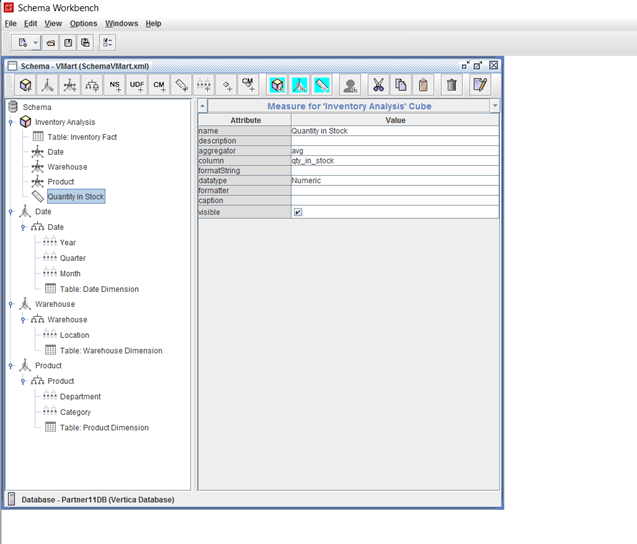
The following example from Pentaho Schema Workbench shows a sample cube we created using the Vertica VMart example database. The cube contains the three dimensions: Date, Warehouse and Product and a single measure: Quantity in Stock.
Publishing the Sample Cube to Pentaho BA Server
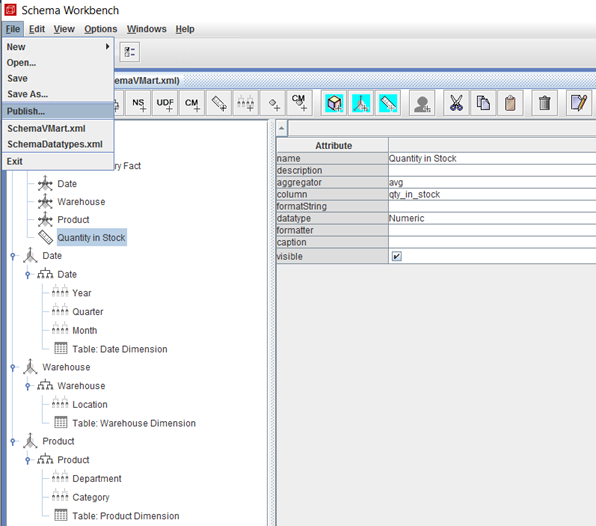
To publish the cube:
- Verify that Pentaho BA Server is running.
- In Pentaho Schema Workbench, save the schema.
-
Select File > Publish.
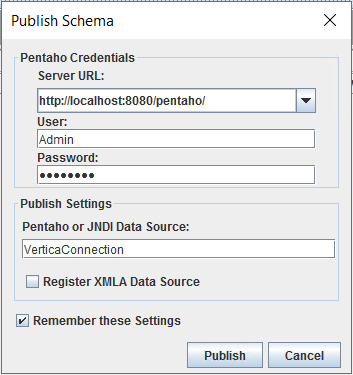
-
In the Publish Schema window, provide the following information:
-
Server URL: URL of Pentaho BA Server.
-
User: Pentaho BA Server user.
-
Password: Pentaho BA Server password.
-
Pentaho or JNDI Data Source: The name you specified for the Vertica connection as explained in the section Connecting Pentaho BA Server to Vertica in this document.
-
-
Click Publish to publish the cube in Pentaho BA Server.
Exploring the Published Schema in Pentaho Analysis Report
For Enterprise Edition
To explore the published schema:
- In your browser, navigate to Pentaho User Console URL: http://localhost:8080/pentaho/Login
-
In the login page, expand Login as an Evaluator, then click Go to log in to Pentaho User Console as an Administrator.
-
In the Home page of Pentaho User Console, navigate to File > New > Analysis Report. The Select Data Source page displays.
-
In the Select Data Source page, select the cube you want to analyze and click OK.
-
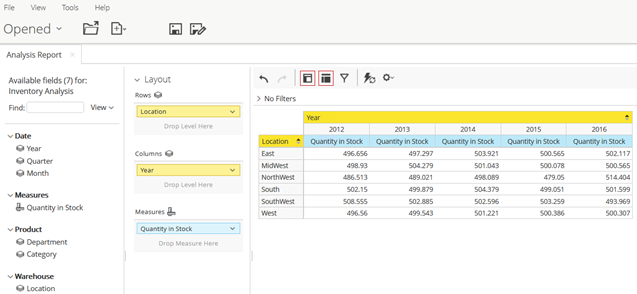
Drag and drop the fields from the left panel to the rows, columns, and measures sections to display the data in tabular format.
Note To refresh your schema in Pentaho BA Server navigate to Tools > Refresh > Mondrian Schema Cache.
Known Limitations
The following are known limitations with data types when visualizing cubes using Analysis Report:
- NUMERIC data type is displayed up to 16 digits beyond which the error “Sorry, something went wrong. For more details contact your system administrator” is displayed.
- For LONG VARCHAR data types, a maximum of 5.2 million characters is displayed.
- For TIME data type, milliseconds are not displayed.
- For TIMETZ data type, milliseconds and time zone offset are not displayed correctly.
- For TIMESTAMPTZ data type, time zone offset is not displayed.
- For BINARY, VARBINARY, and LONG VARBINARY data types, values are not displayed correctly.
For information about Vertica’s specific data types, see SQL Data Types in the Vertica documentation.
For More Information
- Hitachi Vantara Pentaho website
- Vertica Integration with Pentaho Business Analytics: Connection Guide
- Vertica Community Edition
- Vertica User Community
- Vertica Documentation

